The simplest reason to paint the ceiling first is in case you get any paint splashes on your walls during the process. If any splashes happen, you can paint over them when you do the walls later.
Painting ceilings can feel like a major challenge, but once you know the best techniques and approach, the whole process becomes much, much easier. In this guide, we’ll take a look at exactly how to paint a ceiling, covering the supplies you’ll need and some handy tips and tricks to save you time and hassle.
WHAT YOU'LL NEED
Before you begin, you'll need to assemble the necessary materials and tools. Here are some of the key supplies you’ll require:
Obviously, different projects will require different amounts of paint and primer. It all depends on the size of the job at hand, with bigger ceilings naturally needing more paint and primer to cover them up entirely. Try our handy paint calculator to get a precise estimate of how much paint you’ll need, based on the size of the ceiling you’re painting.
INSTRUCTIONS FOR PAINTING THE CEILING
Painting a ceiling can seem daunting, but we'll break the whole process down into simple steps you can follow along with. With the right preparation and approach, your project just might feel easier.
STEP 1: WIPE DOWN THE CEILING AND REMOVE VENTS
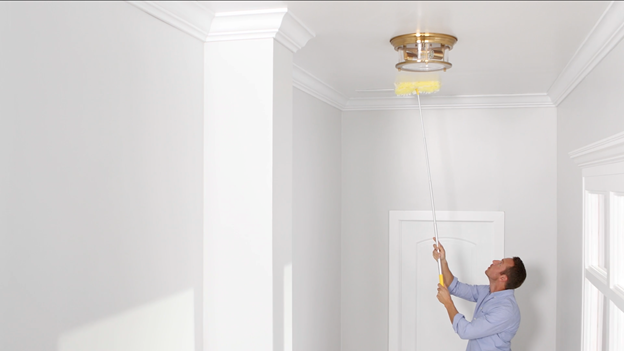
First up, the best way to paint a ceiling starts with proper preparation. You'll need to get the ceiling and surrounding room ready to be painted. To start off, wipe down the ceiling with a clean damp cloth and mild soapy solution to remove any dirt, dust, cobwebs, and grime. This will help you avoid getting any dirt or hairs stuck in the paint, creating a smooth, even finish.
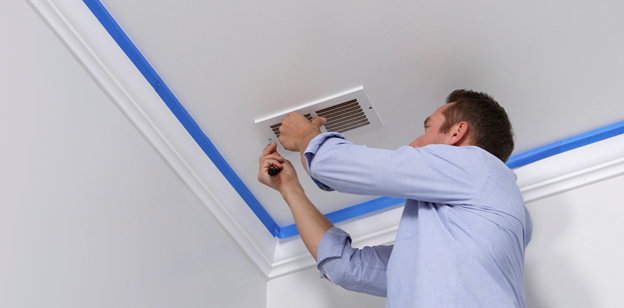
You’ll also need to remove any vents that might be present in the ceiling. Unscrew each vent with care, with the aid of a ladder and screwdriver, and set it aside during the painting process. This is a crucial step of how to paint a ceiling the right way, as any vents left in place are at risk of getting splashed with the paint, which can make the whole space look messy.
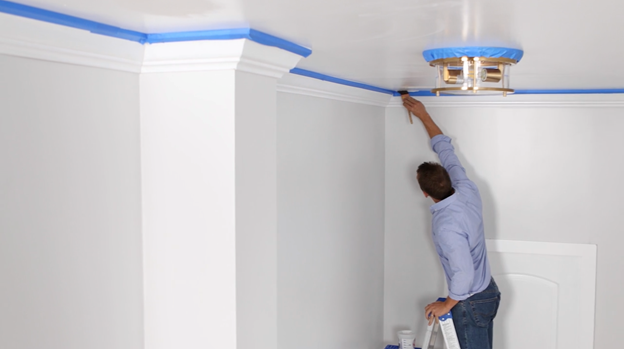
STEP 2: TAPE THE TRIM
Ever wondered about how to paint straight lines between wall and ceiling? Well, it’s all done with tape. Painter’s tape, to be precise. Take some strips of this tape and run them along the trim and edges of the ceiling. The tape will cover up the trim so that you don’t accidentally paint any parts of it while doing the ceiling.
STEP 3: PRIME YOUR CEILING
Priming a ceiling, just like priming a wall, can help to prepare the surface to be painted. A stain-blocking or specialty primer, like Valspar Multi-Surface, may be used to cover any marks, spots, or stains on the ceiling surface. Remember to leave the primer to dry for an hour or so before moving on.
STEP 4: CUT IN ALONG THE TRIM
Next, it’s time to start painting. Experts often say that the easiest way to paint a ceiling is to cut in from the outside. So, starting by the trim, use an angled brush and cut inwards along the ceiling. This will help you cover over the difficult edges to begin with, and you can then work your way towards the center as you go.
STEP 5: PAINT WITH A ROLLER AND EXTENDER
Once the trim and edges of the ceiling have been taken care of with your brush, you can start speeding up the process with the help of your roller. Grab a roller, dip it in the paint tray, and start spreading paint across the ceiling. Try to begin in one corner, and use straight line motions, all in the same direction. Focus on small sections, one by one, and proceed until the ceiling is covered.
STEP 6: REMOVE TAPE AND REPLACE CEILING VENTS
Finally, once you’ve mastered how to paint ceiling edges and how to paint ceiling with a roller, you’ll need to finish the job correctly. With all the paint in place and given time to dry, get back up on your ladder and remove the painter’s tape from the trim. You can also take this time to fit the ceiling vents back in position and then step back and admire your hard work.
Painting the Ceiling FAQs
The secret of how to paint straight lines between wall and ceiling is to use painter’s tape. Run the tape along the edge of the ceiling to prevent any little drips or drops. When you take it away, you’ll have a perfect line.
It’s best to roll your paint onto the ceiling in straight lines, all going in the same direction. Start in one corner of the room and work in small sections. Finish your rolled sections by lightly rolling off in the same direction. This will help to avoid unwanted streaks.
It depends. One coat may suffice in some cases, but two coats will help to cover up any marks or previous color and give your ceiling a brighter and more impressive finish.
A professional can paint a ceiling in about an hour, depending on the size and ease-of-access.
